

Keurig produces an excellent lineup of easy-to-use coffee machines that can brew a fresh cup in just a minute or two. While there’s little in the way of upkeep for these powerful coffee makers, once in a while, you’re going to want to descale your Keurig machine.
“Scale” is a buildup of mineral deposits that settle on your Keurig machine’s internal components in the form of limescale. It’s extremely common for scaling to occur in any coffee maker, but it’s just as important to stay on top of removing it. Excess buildup can make it hard for your Keurig to operate properly.
You should descale your Keurig every three months, and it takes about one hour to properly descale the machine.
Note: This is about descaling specifically. If you want to give a dirty Keurig a thorough cleaning, check out our guide on how to clean the coffee machine as well.

Prepare your Keurig for descaling
Before we start, this is a good time to give some of your Keurig’s brewing components a quick soap wash. Try to dedicate at least an hour to this preliminary step. Unplug the maker, then remove the lid, mug tray, and K-Cup holder. Scrub the tray and holder with warm soapy water, then rinse and dry. Wipe down the lid and body of your Keurig with a damp soapy cloth, and give these pieces some time to air dry.
Once all components have dried, reassemble. Now, you can start the descaling process.
Step 1: Make sure to empty your machine, and then clear out a nearby sink to create plenty of room. Pour whatever water is left in the water reservoir down the drain, and make sure there are no K-cups left inside the brewer.
Step 2: Find a large mug to use for draining, and make sure no one is going to need their coffee fix for the next few hours.
Prepare your descaling agent
Now you need an acidic descaler to run through your brewer so it can break apart the mineral deposits. There are two popular descaling choices, both with pros and cons.
Step 1: Select a descaling agent.
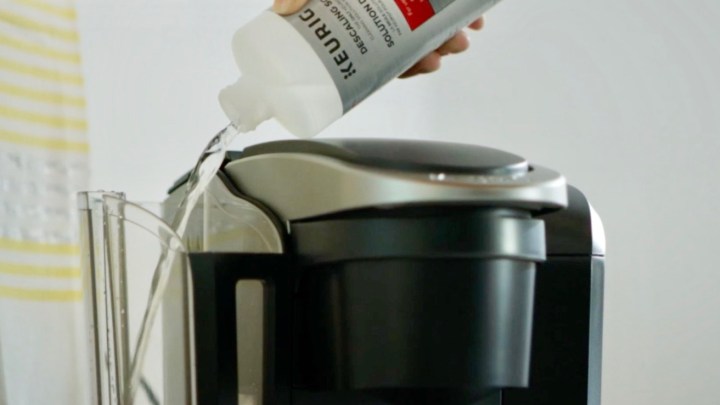
Keurig descaling solution: Keurig sells its own descaling solution that you can buy for around $15, which lasts for a one-time use. It’s an easy option that doesn’t require much effort, and by all accounts gets rid of scale. But according to customer reviews of the product, the solution tends to have a citrus odor that can be very hard to get rid of and may even affect the taste of your coffee.
White vinegar: White vinegar is cheap, readily available, and works great on scale. You’ll need at least several cups for a good cleansing, which means you may need to buy some specifically for this project. Also, it is vinegar, which means your kitchen or break room may reek of that vinegar smell for a bit.
Step 2: If you’re using the Keurig solution, empty the entire bottle into the reservoir, and then fill the rest with clean water. For white vinegar, fill the reservoir with half vinegar and half water — possibly even more vinegar than water for a really tough descaling job.
Run your descaler through the Keurig
It’s time to clean the machine. If your Keurig has a bad scale problem, it may not be able to fill up a full cup even on the right setting. That’s OK though, as the solution takes a little time to work.
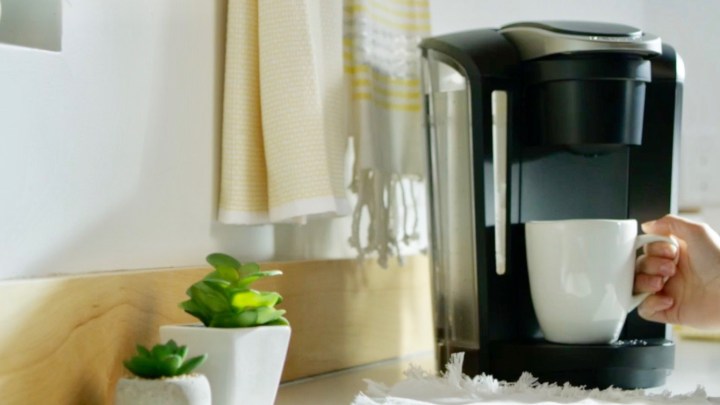
Step 1: Set your Keurig for a normal, full cup of coffee — you can go larger if you have a thermos nearby, but a mug typically works best. (And again, make sure there’s no K-Cup inside.) Run the descaling solution through the machine and wait for the cup to fill.
Step 2: Continue filling cup after cup and pouring them down the drain. If you used the white vinegar solution, the room is really going to start smelling like vinegar, but hang in there and keep going until the reservoir is empty.
Step 3: When complete, the water should be pouring more smoothly and filling up cups a bit more easily. If you don’t notice any improvement at all, you may want to fill the reservoir with more solution and repeat the whole process.

Flush the Keurig with fresh water
Let your Keurig sit still (while still turned on) for about 30 minutes to allow the acid to dissolve the scale left inside the brewer fully. Then you’re ready to move on to the last step.
Step 1: Thoroughly clean and wipe down the reservoir so that you remove all the vinegar and solution. When you’re finished, fill the reservoir with clean water to start completely flushing out the descaling solution.
Step 2: Program the Keurig to make a full cup, run several water cups through the brewer again, and discard each of these. If your Keurig has a carafe setting, select it to maintain a steady flow of water.
Step 3: Refill the reservoir when it’s empty and go through the process again. You’ll want to refill the reservoir at least two times with water to clean out your Keurig thoroughly. Before you start, make sure you have something to catch and discard the water.
Step 4: When you’ve finished, taste-test the water to see if you can detect any traces of descaler. You can’t flush out your machine too much, so if you don’t think it’s clean enough, run through the process as many times as necessary.
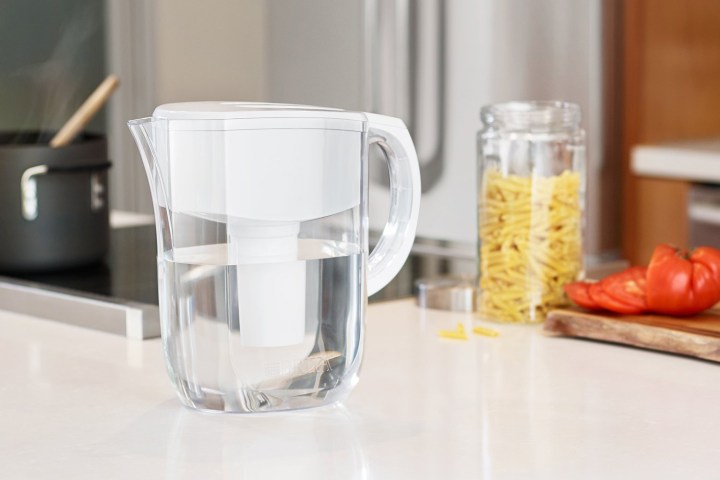
If you read your Keurig instruction manual, you’ll notice that it recommends always using filtered or bottled water, which is important to avoid buildup caused by minerals and contaminants found in tap water. Regularly buying bottled water can get expensive (and is terrible for the environment), so it might make sense to purchase a filtered water jug specifically for your Keurig machine. Using filtered water will lengthen your Keurig’s life span. The filter expense is worth the investment because it will save you time and money in the long run.
Editors’ Recommendations


