

When connecting a mechanical hard drive (HDD), solid-state drive (SSD), or an external USB hard drive to a computer, Windows 10 can usually detect and set it up automatically. However, sometimes, a newly added drive may not show up in File Explorer, which could indicate a number of problems.
For instance, it could mean that there is a physical problem with the data or power connection. If the hard drive does not appear in File Explorer, this could indicate that the device is disabled, offline, or does not have a drive letter. You may be trying to connect a drive previously installed on another computer, the partition on the USB drive may be corrupted, or you could be dealing with a raw drive that was never configured. Therefore it was never initialized or formatted.
Whatever the reason it might be, Windows 10 includes multiple ways to fix the issue and regain access to the drive using Device Manager, Disk Management, and command-line tools like diskpart.
In this Windows 10 guide, we will walk you through several ways to troubleshoot a hard drive that refuses to show up in File Explorer.
How to fix missing hard drive in File Explorer using physical troubleshooting
On Windows 10, if a traditional mechanical hard drive (HDD) or solid-state drive (SSD) does not appear in File Explorer, there are many reasons why this is happening, but before checking and modifying the system settings, try these troubleshooting steps:
- Confirm the hard drive is correctly connected to the computer and receiving power.
- If it is an external USB hard drive, disconnect it and try a different USB port. If you are using a USB hub, try to connect the drive directly to the computer.
- If it is an internal hard drive, make sure the data and power cables are correctly connected to the storage device, motherboard, and power supply. When checking the internal components, make sure to power off and unplug the computer before beginning the process.
- Connect the drive to another computer to determine the problem is not the device.
- Access the computer Basic Input Output System (BIOS) or Unified Extensible Firmware Interface (UEFI), and make sure the firmware is detecting the storage. Since the motherboard firmware is different per-manufacturer and even per-device model, make sure to check the manufacturer support website for more specific instructions.
Once you determine that it is not a physical problem, then you can use the following recommendations to fix the most common problem prevent File Explorer from showing a hard drive.
How to fix missing hard drive in File Explorer using Device Manager
In the rare case that the storage does not appear in Disk Management and File Explorer, it could mean that the hard drive seems to be disabled. If this is the case, you can enable it quickly using Device Manager.
To enable a hard drive using Device Manager, use these steps:
- Open Start.
- Search for Device Manager and click the top result to open the app.
- Expand the Disk drives branch.
-
Right-click the hard drive in question and select the Properties option.

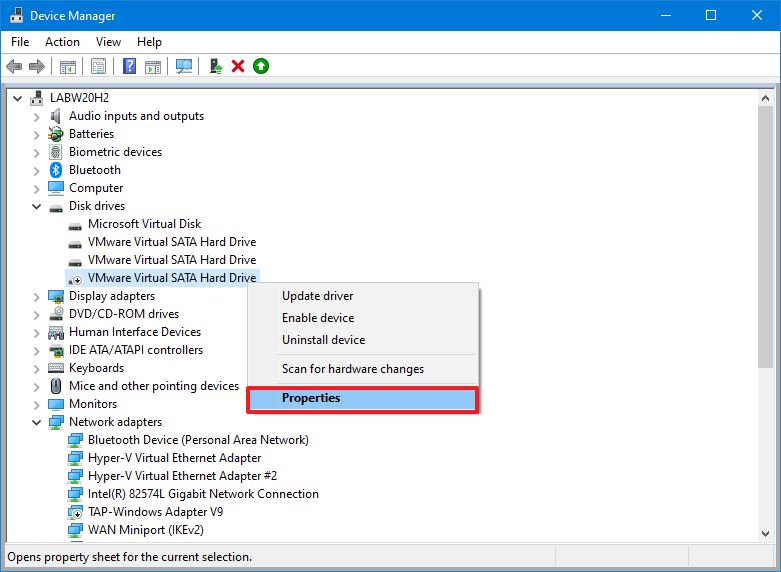 Source: Windows Central
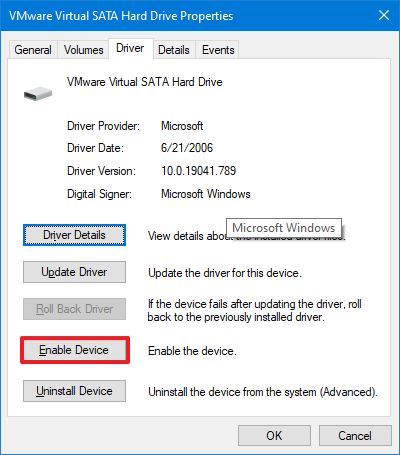
 - Click the Driver tab.
-
Click the Enable Device button.

 Source: Windows Central
 - Click the OK button.


After you complete the steps, the hard drive and data should be accessible on the computer.
How to fix missing hard drive in File Explorer using Disk Management
There are a few requirements for a hard drive to be available in File Explorer. The device must be online and initialized. It needs to have a partition properly configured. And it has to have a drive letter assigned, or it should be mounted as a folder.
If you are dealing with any of these problems, the steps below will help you to troubleshoot and fix the most common issues with Disk Management.
Set drive online
To bring a hard drive online, use these steps:
- Open Start.
- Search for Disk Management and click the top result to open the app.
-
Right-click the disk with the “Offline label” and select the Online option.

 Source: Windows Central

After you complete the steps, if the hard drive was offline and previously configured, it should appear in File Explorer. If the drive was offline but never configured, continue with the steps below.
Initialize drive
To initialize a hard drive on Windows 10, use these steps:
- Open Start.
- Search for Disk Management and click the top result to open the app.
-
Right-click the disk with the “Unknown” label and select the Initialize Disk option.
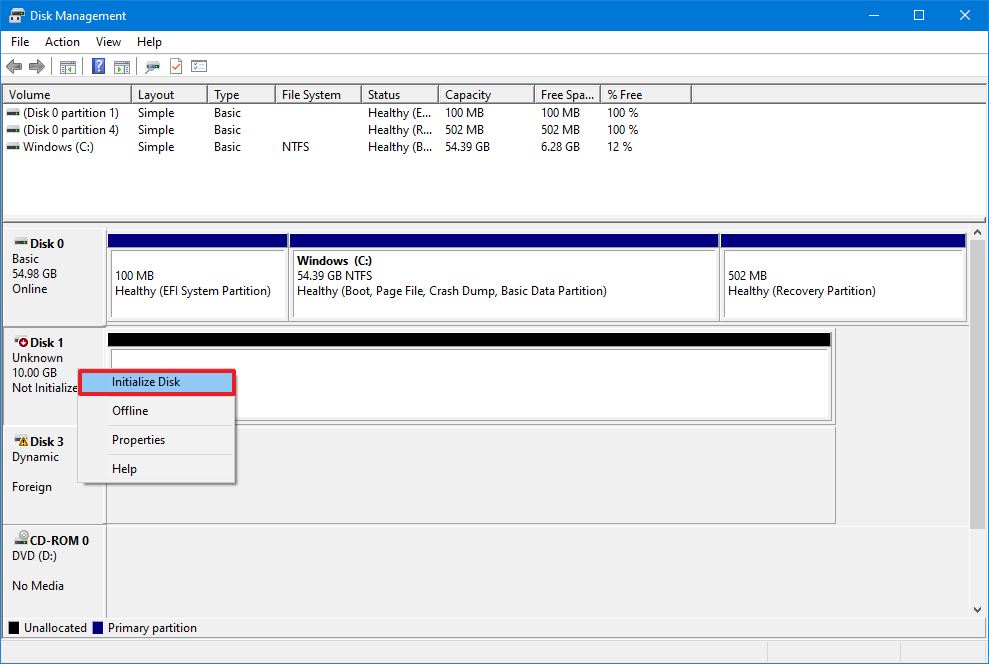 Source: Windows Central
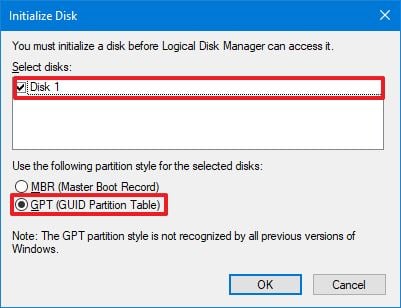
 - Under the “Select disks” section, check the drive you want to initialize.
-
Select the GPT (GUID Partition Table) option.

 Source: Windows Central
 - Click the OK button.


Once you complete the steps, this action will erase everything on the drive and prepare it to be formatted if the storage was never initialized.
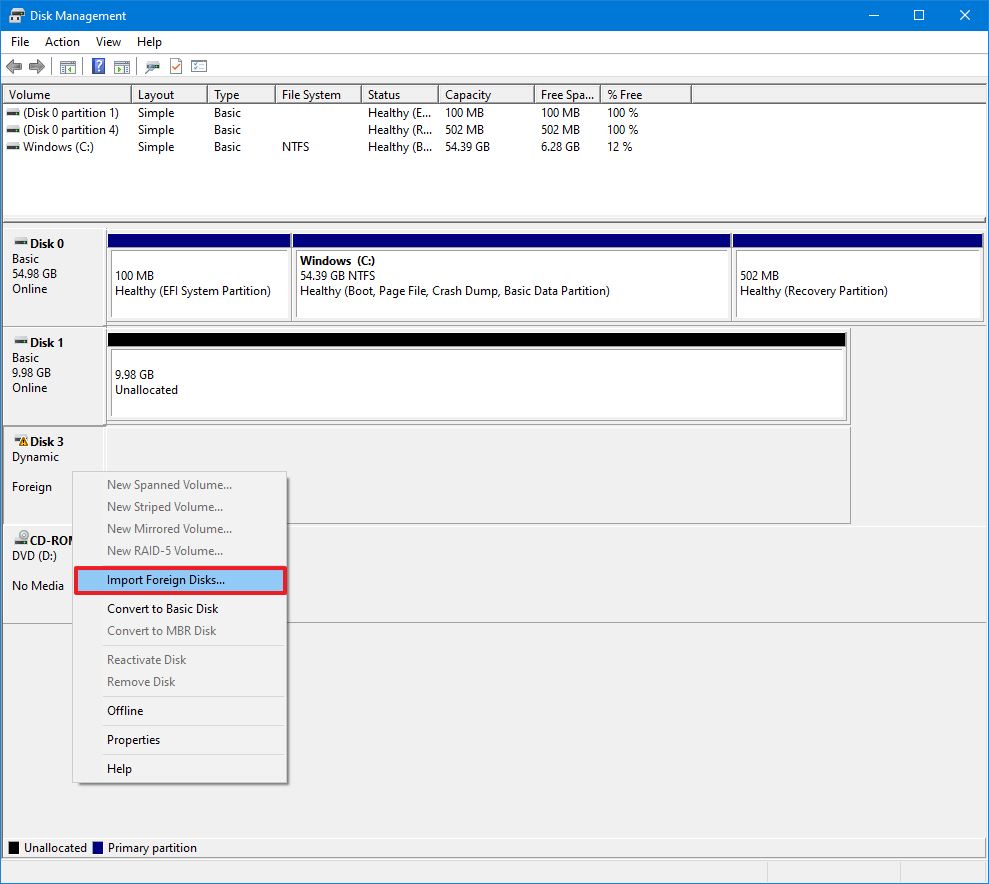
Import foreign drive
If the drive you are trying to access was configured as a dynamic disk on another computer, it will appear as a foreign drive on a different device, and you will need to import it using the Disk Management tool. This process should grant you access to the data without destroying it, but it’s still recommended to create a backup of the data before proceeding.
To import a hard drive with a dynamic configuration to make it accessible through File Explorer, use these steps:
- Open Start.
- Search for Disk Management and click the top result to open the app.
-
Right-click the disk with the “Dynamic” label and select the Import Foreign Disks option.

 Source: Windows Central
 -
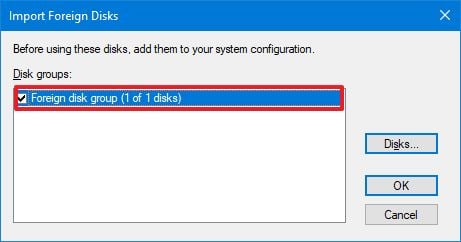
Under the “Disk groups” section, select the Foreign disk group (1 of 1 disks) item.

 Source: Windows Central
 - Click the OK button.
- Click the OK button again.


Once you complete the steps, the hard drive will be imported, and the data will be accessible from File Explorer or any other application.
Configure drive letter
On Windows 10, when the hard drive is online and initialized and does not appear in the system, there could be two reasons. The drive does not have a drive letter. Or if it was connected to another computer, and the new system is now trying to assign the same drive letter already assigned to another drive on the machine.
To assign a drive letter to storage media on Windows 10, use these steps:
- Open Start.
- Search for Disk Management and click the top result to open the app.
-
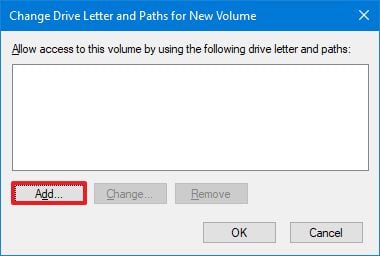
Right-click the partition on the hard drive without a drive letter and select the Change Drive Letter and Paths option.

 Source: Windows Central
 - Click the Add button.
-
Select the Assign the following driver letter option.

 Source: Windows Central
 -
Use the drop-down menu option and select a drive letter – for example, Z, X, or Y.

 Source: Windows Central
 - Click the OK button.


After you complete the steps, the hard drive data should now be accessible using File Explorer.
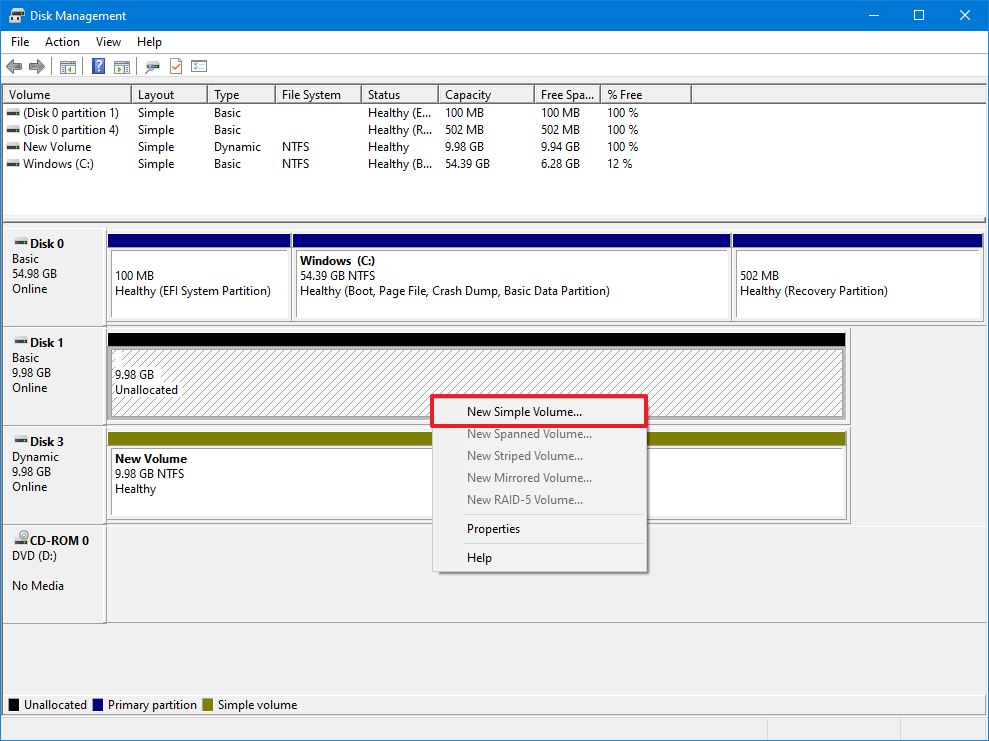
Configure new partition
If the drive is online and initialized, you may be dealing with a drive without a formatted partition. In this case, you can use the Disk Management wizard to configure and assign a letter to partition.
To set up and format a hard drive to allow it to appear in File Explorer, use these steps:
- Open Start.
- Search for Disk Management and click the top result to open the app.
-
Right-click the partition on the hard drive without a drive letter and select the New Simple Volume option.
 Source: Windows Central
Quick tip: Usually, the “basic” drive will have a blue stripe indicating the beginning and end of the partition. Also, make sure to select the correct storage, as the following steps will erase everything on the hard drive you will choose.
- Click the Next button.
-
Click the Next button to use all the available space for the partition. Otherwise, specify the size in the Simple volume size in MB option.

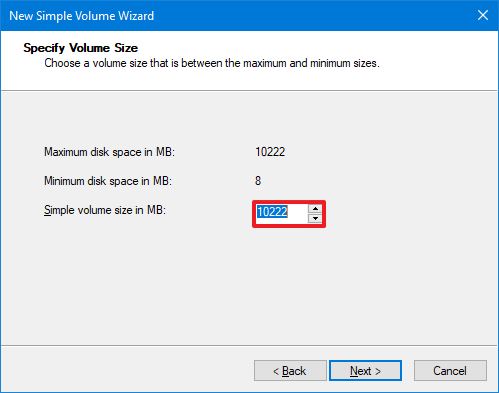 Source: Windows Central
 - Select the Assign the following driver letter option.
-
Use the drop-down menu option and select a drive letter – for example, Z, X, or Y.
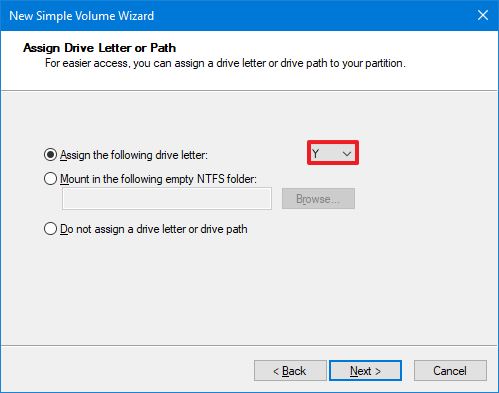 Source: Windows Central
 - Click the Next button.
- Select the Format this volume with the following settings option.
- Use the “File system” drop-down menu and select the NTFS option.
- Use the “Allocation unit” size drop-down menu and select the Default option.
- In the “Volume label” field, confirm a descriptive name for the drive – for example, data.
-
Check the Perform a quick format option.
 Source: Windows Central
 - Click the Next button.
- Click the Finish button.


Once you complete the steps, the hard drive will be listed on the “This PC” page of File Explorer, and you can start saving files in it.
If you happen to be dealing with a damaged hard drive, we recommend the Western Digital My Book because of its reliability and affordability. Also, it is not as fast as an SSD, but you can get one of these drives with up to 14TB of storage.
How to fix missing hard drive in File Explorer updating driver
If the problem is related to the storage driver, you can reinstall or update the driver to the latest version to resolve the issue.
To reinstall the hard drive driver, use these steps:
- Open Start.
- Search for Device Manager and click the top result to open the app.
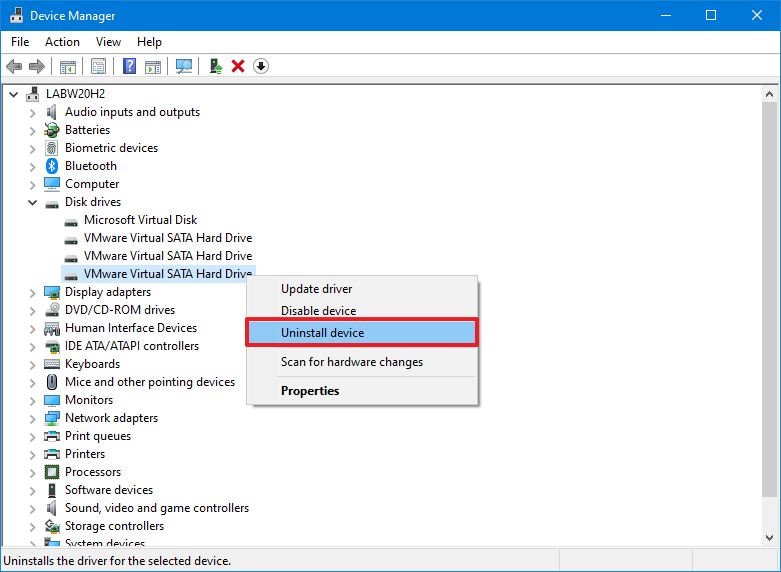
- Expand the Disk drives branch.
-
Right-click the hard drive in question and select the Uninstall device option.
 Source: Windows Central
 - Click the Uninstall button.
- Restart the computer

Once you complete the steps, Windows 10 should reinstall the driver automatically, and the hard drive should now appear in File Explorer.
Update hard drive driver
If the problem persists, it is recommended to download the latest available driver from the drive manufacturer support website and use their instructions to update the driver.
If the support website does not offer any instructions, unpack the driver zip folder, and then use these steps:
- Open Start.
- Search for Device Manager and click the top result to open the app.
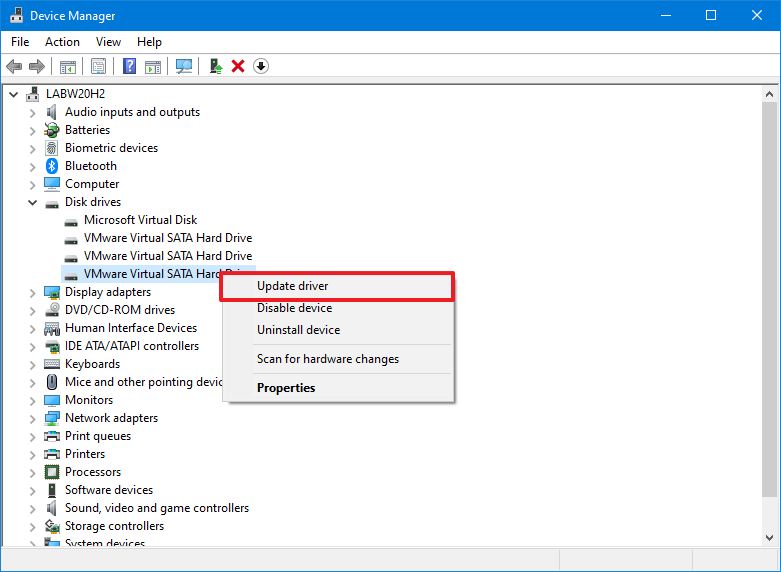
- Expand the Disk drives branch.
-
Right-click the hard drive in question and select the Update driver option.
 Source: Windows Central
 -
Select the Browse my computer for drivers option.

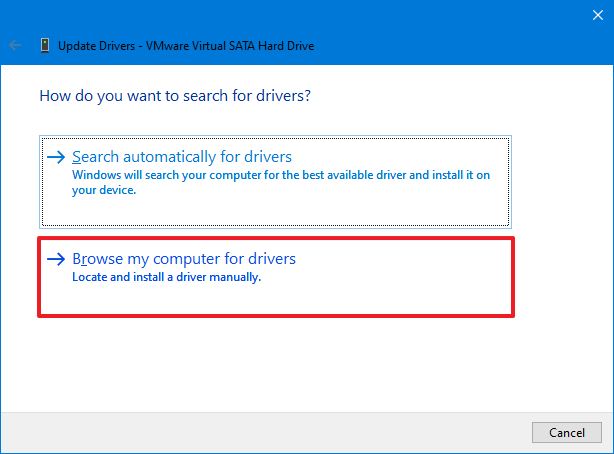 Source: Windows Central
 -
Click the Browse button.
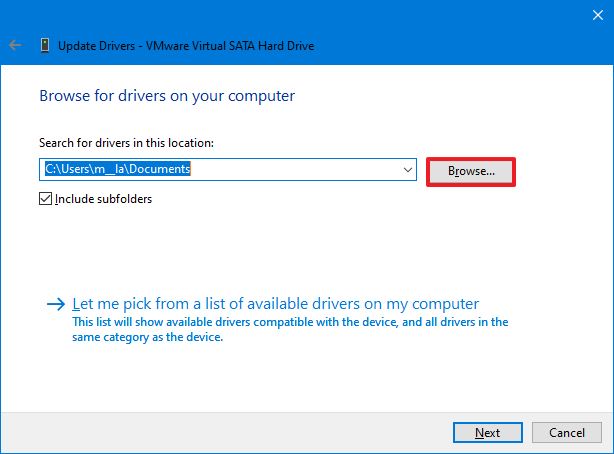 Source: Windows Central
 - Select the folder with the extracted driver files.
- Click the OK button.
- Check the Include subfolders option.
- Click the Next button.
- Click the Close button.


After you complete the steps, the driver will install, and the hard drive should be accessible on Windows 10.
How to fix missing hard drive in File Explorer using diskpart
Alternatively, if the hard drive appears in the Disk Management, but if the storage is not usable, meaning that you cannot access the data, you cannot use the format option or assign a drive letter, then it could be a logical problem. If this is the case, you can use a command-line tool, such as diskpart, to clean the drive and start from scratch.
To use diskpart to missing hard drive in File Explorer, use these steps:
- Open Start.
- Search for Command Prompt, right-click the top result and select the Run as administrator option.
-
Type the following command to launch the diskpart tool and press Enter:
diskpart -
Type the following command to list the available disks and press Enter:
list disk -
Type the following command to select the hard drive not showing up in File Explorer and press Enter:
select disk 1In the command, make sure to select the correct drive. Otherwise, you may end up erasing the data in the wrong storage, which cannot be undone.
-
Type the following command to completely erase the drive and press Enter:
clean
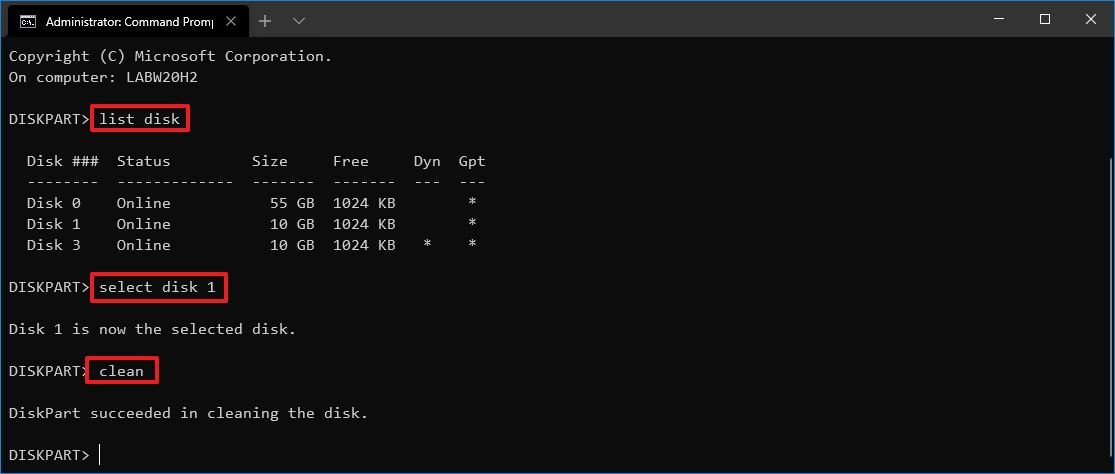 Source: Windows Central
Warning: The “clean” command will erase everything, including data, partition, type, and the drive will appear blank with the label unknown and not initialized.
-
Type the following command to create a partition using the available space and press Enter:
create partition primary -
Type the following command to select the newly created partition and press Enter:
select partition 1 -
Type the following command to set the partition as active and press Enter:
active -
Type the following command to format the partition with the NTFS file system and press Enter:
format FS=NTFS -
Type the following command to assign a drive letter and press Enter:
assign letter=Z
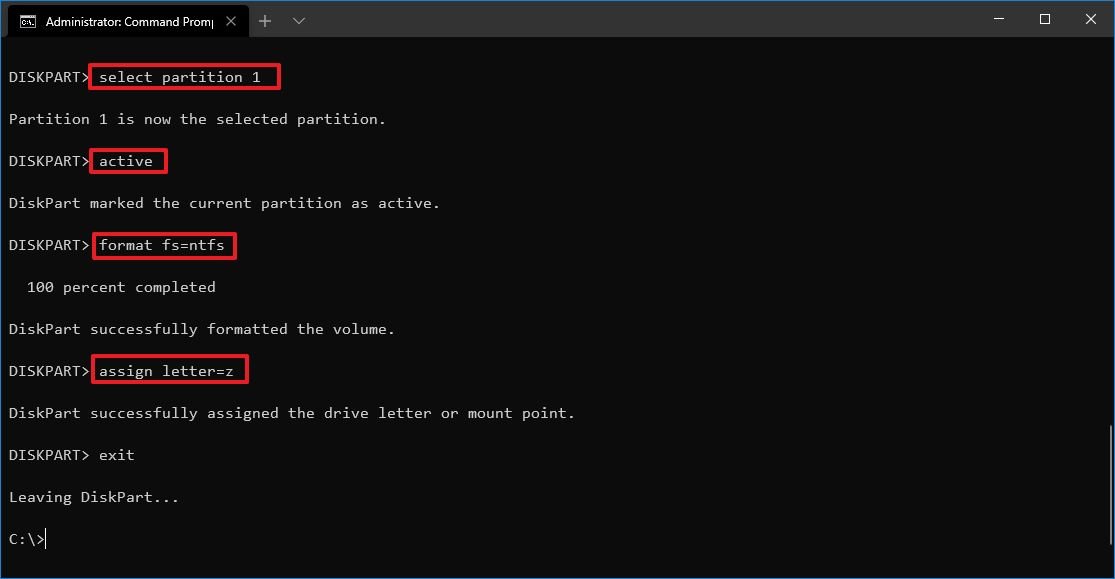 Source: Windows Central
In the command, change “Z” for another drive letter not already in use.
-
Type the following command to close diskpart and press Enter:
exit


Once you complete the steps, the hard drive will be formatted, it will include a new drive letter, and it should now appear in File Explorer.
More Windows 10 resources
For more helpful articles, coverage, and answers to common questions about Windows 10, visit the following resources:
We may earn a commission for purchases using our links. Learn more.

AMD unveils new Radeon RX 6700 XT GPU
AMD announced the Radeon RX 6700 XT at its hardware event today. The GPU is built on AMD’s RDNA 2 architecture. The card competes with some of the best on the market, including NVIDIA’s RTX 3060 Ti and RTX 3070.

")
